Neo Start Menu Style for Windows 11
Enable Neo Start Menu Style for Windows 11 using Windhawk and Windows 11 Start Menu Styler. Customize your desktop with neon glow, glass effects, futuristic design, and a modern Windows 11 look.

Neo Start Menu Style for Windows 11
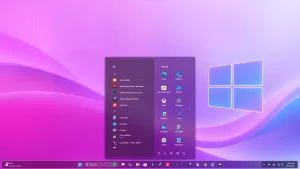
The Neo Start Menu Style for Windows 11 is a futuristic and stylish Windhawk customization setup designed for users who want a modern desktop transformation. It brings neon glow effects, glass-inspired transparency, smooth spacing, and a premium visual layout to the default Windows 11 Start Menu.
Windows 11 already has a clean and centered interface, but many users want more freedom to personalize their desktop. The Neo Start Menu Style gives your system a bold and advanced look without making the interface confusing. It is perfect for users who enjoy cyberpunk themes, neon desktop setups, glass taskbars, and modern Windows customization.
Using Windhawk and the Windows 11 Start Menu Styler mod, this style can transform the standard Start Menu into a futuristic command-center style interface. It combines depth, transparency, glow, and smooth visual balance to create a desktop experience that feels fresh, modern, and unique.
The Neo Start Menu Style for Windows 11 is also lightweight and practical for daily use. It focuses on appearance, readability, and smooth performance, making it suitable for gamers, creators, students, professionals, and Windows theme enthusiasts.
What Is Neo Start Menu Style for Windows 11?
The Neo Start Menu Style is a Windows 11 customization design inspired by futuristic UI concepts, neon lighting, and modern glass effects. Instead of using a plain Start Menu background, it adds a more advanced visual appearance with glowing edges, soft transparency, and a clean modular layout.
This style is ideal for users who want their desktop to look different from the default Windows 11 setup. It gives the Start Menu a stronger personality while keeping the interface easy to navigate and comfortable to use.
Why Choose Neo Start Menu Style?
The main reason to choose the Neo Start Menu Style for Windows 11 is its futuristic design. It gives your Start Menu a premium visual upgrade with neon-inspired details and glass-like effects. This makes your desktop feel more dynamic, modern, and visually attractive.
Another benefit is flexibility. Since this style works with Windhawk, you can apply, adjust, or remove it without replacing important Windows system files. This makes it a convenient option for users who like testing different Windows 11 customization styles.
Key Features of Neo Start Menu Style
- Futuristic Neo Design: Adds a modern and advanced visual style to the Windows 11 Start Menu.
- Neon Glow Effects: Creates a stylish glowing appearance around selected menu elements.
- Glass-Inspired Transparency: Blends the Start Menu smoothly with your wallpaper and taskbar setup.
- Clean Modular Layout: Keeps apps, icons, and menu sections visually organized.
- Enhanced Search Area: Gives the search section a more visible and modern appearance.
- Wallpaper Friendly: Works well with dark, neon, abstract, cyberpunk, and gradient wallpapers.
- Lightweight Customization: Designed to improve appearance without making Windows feel slow.
Best Desktop Setup for This Style
The Neo Start Menu Style looks best with a futuristic desktop setup. You can pair it with a dark neon wallpaper, transparent taskbar, colorful icon pack, and minimal Rainmeter widgets. This combination creates a complete Windows 11 customization look instead of changing only the Start Menu.
For a gaming-style setup, use cyberpunk wallpapers, RGB-inspired colors, and glowing taskbar effects. For a clean professional setup, use dark gradients, soft blue or purple lighting, and minimal desktop icons.
Download Windhawk To Use The Style
How to Install Neo Start Menu Style
- Download and install Windhawk.
- Open Windhawk and install the Windows 11 Start Menu Styler mod.
- Open the mod settings page.
- Go to the Advanced tab.
- Paste the provided configuration code into the Mod settings box.
- Click Save to apply the style.
- Restart Windows Explorer if the style does not appear instantly.
- For more details, visit this GitHub guide.
Compatibility
- Windows 11 21H2 YES
- Windows 11 22H2 YES
- Windows 11 23H2 YES
- Windows 11 24H2 YES
- Windows 11 25H2 YES
What Is Included in This Pack?
- Windhawk Start Menu Mods
- Windhawk Taskbar Mods
- Windhawk Taskbar Size Mods
{ "controlStyles[0].target": "Windows.UI.Xaml.Controls.Grid#UndockedRoot", "controlStyles[0].styles[0]": "Visibility=Visible", "controlStyles[0].styles[1]": "Width=258", "controlStyles[0].styles[2]": "Transform3D:=<CompositeTransform3D TranslateX=\"178\" />", "controlStyles[0].styles[3]": "Margin=-80,-20,0,0", "controlStyles[0].styles[4]": "Padding=0,0,0,0", "controlStyles[1].target": "Windows.UI.Xaml.Controls.Grid#AllAppsRoot", "controlStyles[1].styles[0]": "Visibility=Visible", "controlStyles[1].styles[1]": "Width=320", "controlStyles[1].styles[2]": "Margin=-615,-20,830,0", "controlStyles[2].target": "Windows.UI.Xaml.Controls.Grid#ShowMoreSuggestions", "controlStyles[2].styles[0]": "Visibility=Collapsed", "controlStyles[3].target": "Windows.UI.Xaml.Controls.Grid#SuggestionsParentContainer", "controlStyles[3].styles[0]": "Visibility=Collapsed", "controlStyles[4].target": "Windows.UI.Xaml.Controls.Grid#TopLevelSuggestionsListHeader", "controlStyles[4].styles[0]": "Visibility=Collapsed", "controlStyles[5].target": "StartDocked.SearchBoxToggleButton", "controlStyles[5].styles[0]": "Height=0", "controlStyles[5].styles[1]": "Width=0", "controlStyles[6].target": "Windows.UI.Xaml.Controls.Grid#TopLevelRoot > Windows.UI.Xaml.Controls.Border", "controlStyles[6].styles[0]": "Visibility=Collapsed", "controlStyles[7].target": "Windows.UI.Xaml.Controls.Button#CloseAllAppsButton", "controlStyles[7].styles[0]": "Visibility=Collapsed", "controlStyles[8].target": "StartDocked.PowerOptionsView", "controlStyles[8].styles[0]": "Margin=0,0,0,0", "controlStyles[9].target": "StartDocked.UserTileView", "controlStyles[9].styles[0]": "Visibility=Collapsed", "controlStyles[10].target": "StartMenu.PinnedList", "controlStyles[10].styles[0]": "Height=504", "controlStyles[11].target": "StartMenu.ExpandedFolderList > Grid > Border", "controlStyles[11].styles[0]": "Margin=-40,0,40,0", "controlStyles[11].styles[1]": "Width=325", "controlStyles[12].target": "StartMenu.ExpandedFolderList > Grid > Grid", "controlStyles[12].styles[0]": "CornerRadius=8", "controlStyles[12].styles[1]": "Margin=-85,0,0,0", "controlStyles[12].styles[2]": "Width=350", "controlStyles[13].target": "StartMenu.ExpandedFolderList > Grid > Grid > Microsoft.UI.Xaml.Controls.PipsPager#PinnedListPipsPager", "controlStyles[13].styles[0]": "Margin=-15,0,0,0", "controlStyles[14].target": "Border#AcrylicOverlay", "controlStyles[14].styles[0]": "Background:=<AcrylicBrush BackgroundSource=\"Backdrop\" TintColor=\"{ThemeResource SystemChromeAltHighColor}\" TintOpacity=\".3\" TintLuminosityOpacity=\".3\" />", "controlStyles[14].styles[1]": "Width=310", "controlStyles[14].styles[2]": "Margin=-255,10,0,-55", "controlStyles[14].styles[3]": "CornerRadius=10", "controlStyles[15].target": "Border#AcrylicBorder", "controlStyles[15].styles[0]": "Background:=<AcrylicBrush BackgroundSource=\"Backdrop\" TintColor=\"{ThemeResource SystemChromeAltHighColor}\" TintOpacity=\"0\" TintLuminosityOpacity=\".5\" />", "controlStyles[16].target": "StartDocked.StartSizingFrame", "controlStyles[16].styles[0]": "MaxWidth=580", "controlStyles[16].styles[1]": "MinWidth=580", "controlStyles[16].styles[2]": "MaxHeight=650", "controlStyles[17].target": "Grid#RootContent", "controlStyles[17].styles[0]": "MinWidth=580", "controlStyles[17].styles[1]": "MaxWidth=580", "controlStyles[18].target": "StartDocked.LauncherFrame > Grid#RootPanel > Grid#RootGrid", "controlStyles[18].styles[0]": "MinWidth=580", "controlStyles[18].styles[1]": "MaxWidth=580", "controlStyles[19].target": "StartDocked.LauncherFrame > Grid#RootPanel > Grid#RootGrid > Grid#RootContent", "controlStyles[19].styles[0]": "MinWidth=580", "controlStyles[19].styles[1]": "MaxWidth=580", "controlStyles[20].target": "StartMenu.PinnedList#StartMenuPinnedList", "controlStyles[20].styles[0]": "MaxWidth=345", "controlStyles[20].styles[1]": "Margin=0,0,0,-5", "controlStyles[20].styles[2]": "Height=504", "disableNewStartMenuLayout": "1"}Conclusion
Upgrading to the Flare Start Menu style for Windows 11 is the easiest way to make your PC feel like a high-end workstation. By following the steps above, you can enjoy a sleek, efficient, and beautiful interface that stands out from the crowd.


